Look, Universal Analytics is officially a ghost. It is 2026, and if you are still whining about how confusing the Google Analytics 4 (GA4) dashboard is, your competitors are already eating your lunch. If your GA4 setup is broken, tracking duplicate conversions, or feeding you garbage data, every single dollar you spend on marketing is a complete blind guess.
You literally cannot optimize a website if you don't trust the numbers on your screen. You will burn through your ad budget, misjudge your ROI, and make terrible decisions based on broken metrics.
Consider this your definitive, zero-fluff blueprint. We are going to ignore the useless Google help docs and look exactly at how to wire up GA4 from scratch. We will cover the data streams, the exact code injections, and how to force this machine to track the custom events that actually put cash in your pocket.
Stop relying on outdated blog posts from 2023. Let's build this the right way.
What Is GA4 and Why Does It Matter?
Forget everything you used to know about analytics. Universal Analytics was obsessed with "pageviews" and "sessions." GA4 doesn't care. GA4 is a ruthless, event-based tracking monster. Literally every single thing a user does—scrolling, clicking a link, playing a video—is fired as an independent "event."
Why did Google force this massive shift? Because the internet broke the old model. Users jump from your Instagram ad on their phone, to your website on their laptop, all while aggressively blocking cookies.
- The Cross-Platform Holy Grail: It perfectly stitches together the chaotic user journey between your mobile app and your website.
- Machine Learning Built-in: When users block cookies, GA4 uses heavy-duty AI to fill in the blind spots, predicting who is going to buy and who is going to bounce.
- BigQuery for Everyone: It lets you dump your raw, unfiltered data directly into Google BigQuery for free. This is enterprise-level data mining that used to cost massive agencies thousands of dollars.
If you set it up wrong, it's a completely useless maze. If you set it up right, it's your biggest competitive advantage.
GA4 vs. Universal Analytics: Key Differences
Stop trying to force GA4 to act like UA. They are fundamentally different beasts:
- The Core Model: UA tracked "sessions." GA4 tracks raw "events." A pageview is no longer special; it is just another event.
- Privacy Survival: GA4 was specifically engineered to survive strict privacy laws (like GDPR) without breaking your conversion tracking.
- Reporting Reality: UA spoon-fed you 50 rigid reports. GA4 hands you a blank canvas called "Explorations" and forces you to build the exact funnel you actually care about.
- Automatic Tracking: Out of the box, GA4 automatically tracks scrolls, outbound clicks, and file downloads. No custom JavaScript required.
Still confused by the architecture? Read the brutal technical breakdown in Google’s official GA4 documentation.
Step 1: Create Your Google Analytics Account

If you are starting from absolute scratch, you need to establish the master account container.
- Go straight to analytics.google.com and log in with a highly secure Google Workspace or Gmail account. (Do not use a random personal email you might lose access to).
- Smash the Admin gear icon in the bottom left corner.
- In the first column (Account), click the Create Account button.
- Name it something logical (like your actual LLC or business name) and accept the data-sharing agreements. Hit Next.
Your master container is now live.
Step 2: Set Up a GA4 Property
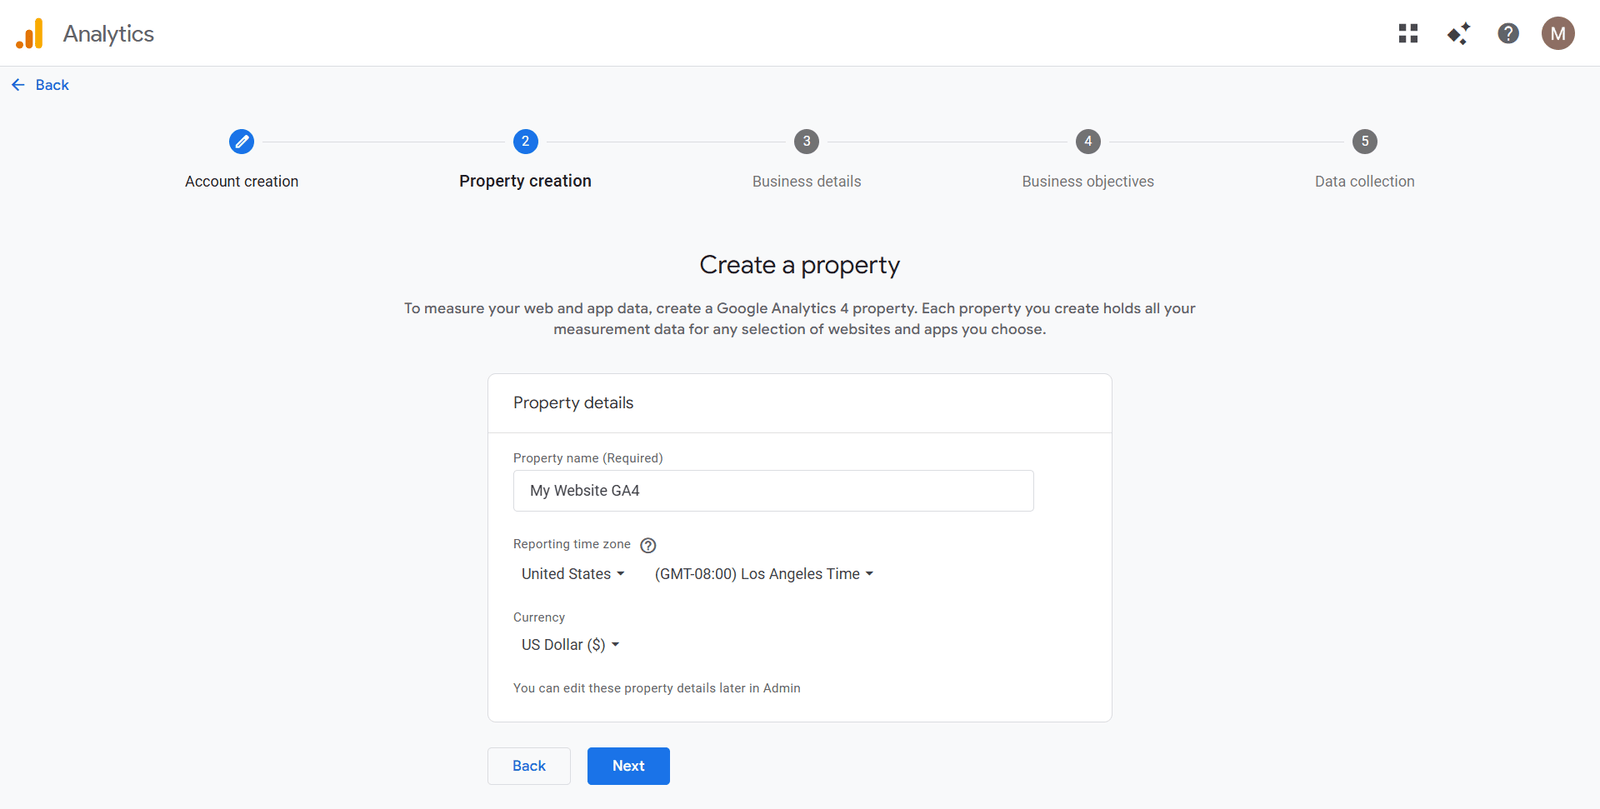
The "Property" is where your actual website data lives. If you run three completely different businesses, you absolutely need three different properties.
- Still in the Admin panel, look at the second column and click Create Property.
- Give it a highly descriptive name (e.g., "Main E-commerce Store GA4").
- Crucial Step: Set your exact reporting time zone and currency. If you mess this up, your midnight sales numbers will be a complete disaster to reconcile later.
- Click Next, tell Google your industry size, and hit Create.
Step 3: Add a Data Stream
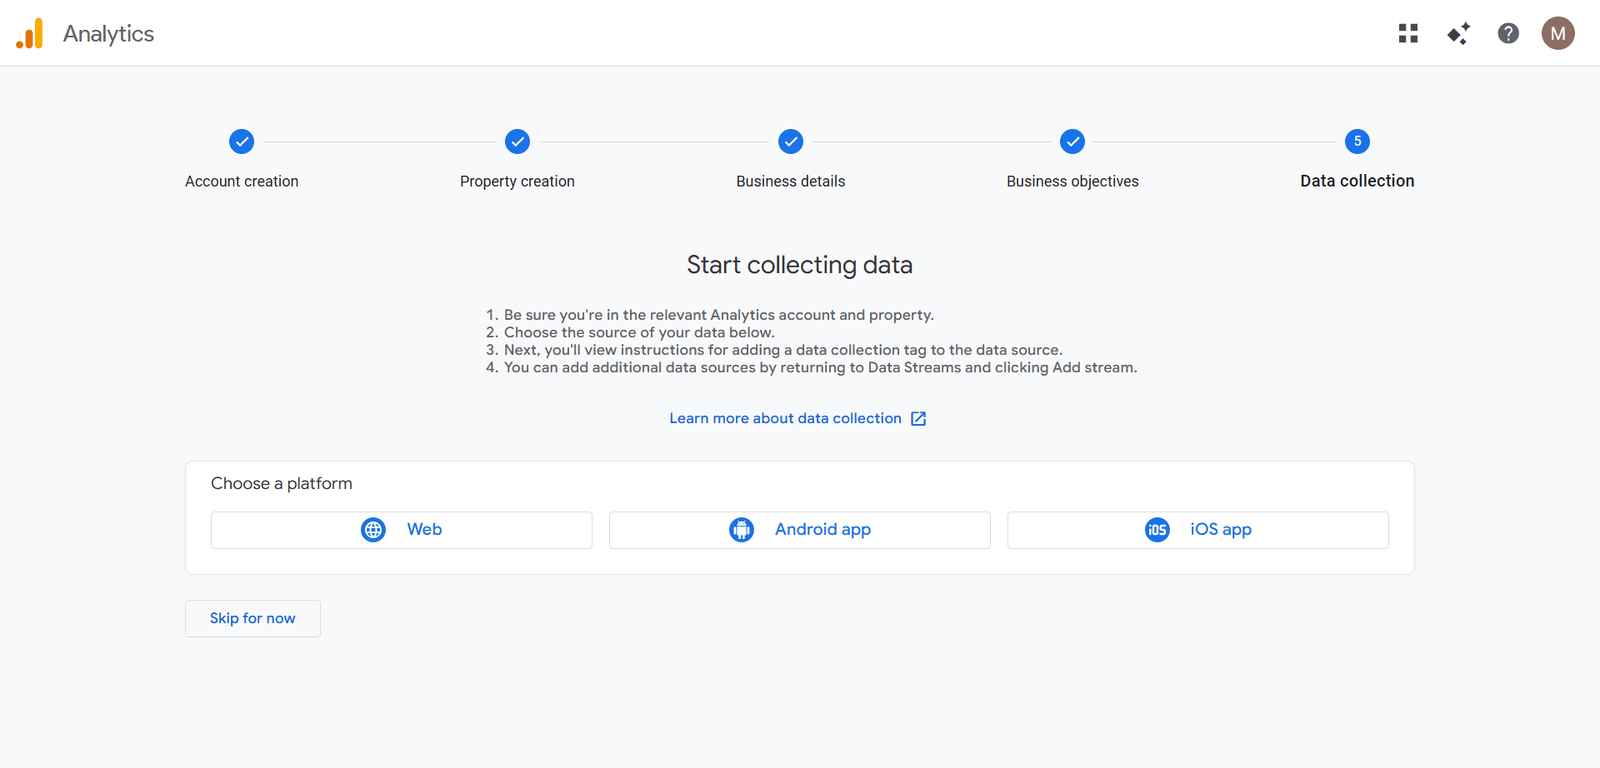

A property is an empty bucket without a data pipe feeding it. You need to open a "Stream."
- The wizard will immediately beg you to set up a Data Stream. Select Web (unless you are tracking a native iOS/Android app).
- Punch in your exact website URL and give the stream a name.
- Leave "Enhanced Measurement" toggled ON. This automatically captures scrolls, video plays, and outbound clicks for free.
- Hit Create stream.
Google will instantly hand you a Measurement ID that looks like this: G-XXXXXXXXXX. Copy that code. It is the key to everything.
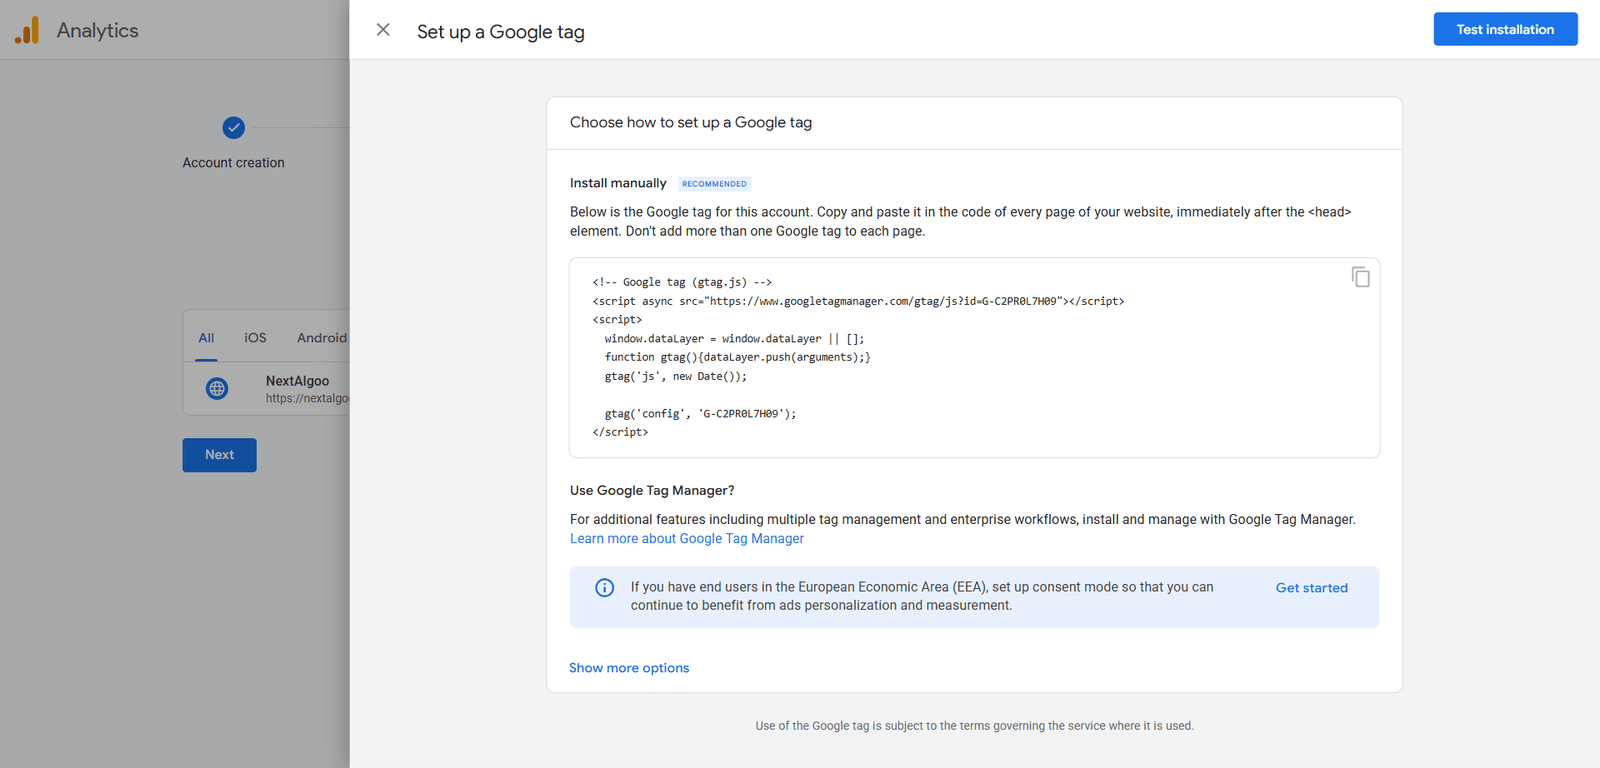
Step 4: Install the GA4 Tag Manually (with Code Examples)
You have to hardcode this tracker into your website's brain. The professional move is using Google Tag Manager (GTM), but if you want to hardcode it manually, here is exactly how you inject the raw gtag.js script.
How to Install GA4 with gtag.js
- Inside your Data Stream details, open the View tag instructions tab.
- Select "Install manually." You will see a raw chunk of JavaScript.
- It looks exactly like this. (Replace
G-XXXXXXXXXXwith your actual Measurement ID):
<!-- Google tag (gtag.js) --> <script async src="https://www.googletagmanager.com/gtag/js?id=G-XXXXXXXXXX"></script> <script> window.dataLayer = window.dataLayer || []; function gtag(){dataLayer.push(arguments);} gtag('js', new Date()); gtag('config', 'G-XXXXXXXXXX'); </script>- You absolutely must paste this code block immediately after the opening
<head>tag on every single page of your website. If you miss a page, that traffic is invisible to you.
The Smarter Way: Google Tag Manager (GTM)
Stop hardcoding random scripts every time you want to track a button. Use GTM instead.
- Put the GTM container code in your site's header.
- Inside the GTM dashboard, create a new Tag and select Google Analytics: GA4 Configuration.
- Paste your
G-XXXXXXXXXXMeasurement ID into the box. - Set the trigger to fire on All Pages. Publish the workspace. You are done.
Step 5: Verify Your GA4 Installation
Never just paste the code and assume it works. That is how you wake up in a month with zero data.
Check in GA4 DebugView
- Open your GA4 Admin panel and click DebugView.
- Open your actual website in a totally different browser window.
- Click around like a maniac. If the code is working, you will see raw events popping up on the DebugView timeline in real-time.
Use Google Tag Assistant
Install the Google Tag Assistant Chrome extension. Run it on your site. If the tag icon turns green and shows your Measurement ID without throwing errors, your engine is running.
Step 6: Set Up Event Tracking (with Code Examples)
Out-of-the-box tracking is for amateurs. Knowing someone looked at a page doesn't pay your bills. You need to explicitly fire an event when someone hands you their email address or credit card.
How to Track a Custom Event with gtag.js
To fire a custom event directly to Google when a massive action happens, use this exact syntax:
gtag('event', 'sign_up', { method: 'Newsletter Form' }); This blasts an event named sign_up straight to your dashboard, and attaches a parameter telling you exactly which form they filled out.
Example: Tracking a Button Click
Let's say you have a massive "Download PDF" button. Your HTML looks like this:
You need to attach an event listener to that button using JavaScript to fire the payload to GA4:
document.getElementById('download-pdf').addEventListener('click', function() { gtag('event', 'file_download', { file_name: 'Ultimate_SEO_Guide.pdf' }); });Use Google's Recommended Events
Stop making up weird event names. Google has a strict dictionary of recommended events (like purchase, login, generate_lead). If you use their exact spelling, it automatically unlocks advanced AI reporting features.
Step 7: Test and Troubleshoot Your GA4 Setup
Things will break. Here is how you troubleshoot the chaos:
- No Data in Real-Time: Check your ad-blockers. Brave browser and uBlock Origin will completely assassinate GA4 scripts locally. Turn them off while testing.
- The 24-Hour Delay: Welcome to GA4. While Real-Time shows instant clicks, your actual standard reports take 24 to 48 hours to fully digest the data. Stop panicking if yesterday's numbers look artificially low.
- Double Counting: If your bounce rate is suddenly 0%, you accidentally installed the GA4 tag twice. Check your source code.
Advanced GA4 Setup Tips and Best Practices
- Mark as Conversion: An event is just raw data until you tell GA4 it matters. Go to the Admin panel, find "Events," and manually toggle your most critical actions (like
generate_lead) as a Conversion. - Filter Internal Traffic: Stop polluting your own dashboard. Go to Data Streams > Configure tag settings > Define internal traffic. Add your office IP address so GA4 ignores you.
- Link Google Ads: If you run ads, link the accounts immediately in the Admin panel. Without this, your attribution modeling is literally useless.
- Data Retention: By default, GA4 deletes user-specific data after 2 months. Go to Admin > Data Retention and aggressively change it to 14 months right now.
GA4 Code Examples for Common Use Cases
If you have a developer (or you are the developer), hand them these exact snippets.
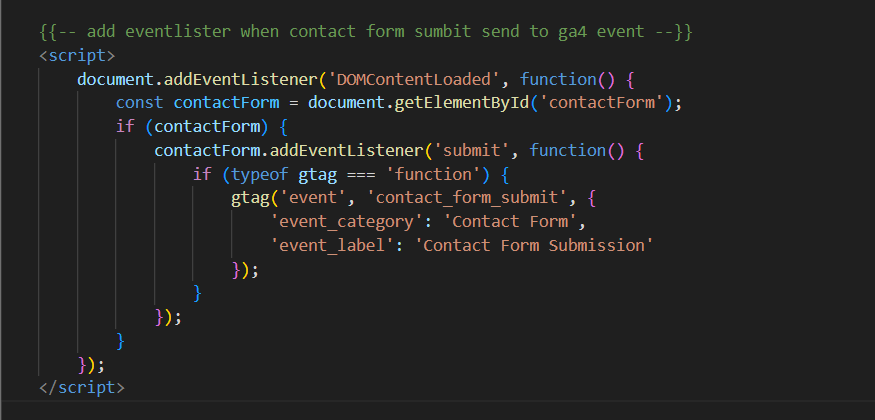
Track a Form Submission
Don't rely on "thank you" page redirects. Track the actual form submission button click:
document.getElementById('contact-form').addEventListener('submit', function() { gtag('event', 'form_submit', { form_id: 'contact-form' }); }); Track E-commerce Purchases
This is the big one. If you don't use Shopify's native integration, you have to push this massive data layer object the exact second a credit card clears:
gtag('event', 'purchase', { transaction_id: 'T12345', value: 99.99, currency: 'USD', items: [ { item_id: 'SKU_123', item_name: 'Product Name', quantity: 1, price: 99.99 } ] }); Set a Custom User Property
Want to track whether a user is a free member or a paid subscriber? Tag them permanently:
gtag('set', 'user_properties', { membership_level: 'gold' }); Read the brutal technical specs in the official GA4 developer documentation before you deploy heavy backend code.
Migrating from Universal Analytics to GA4
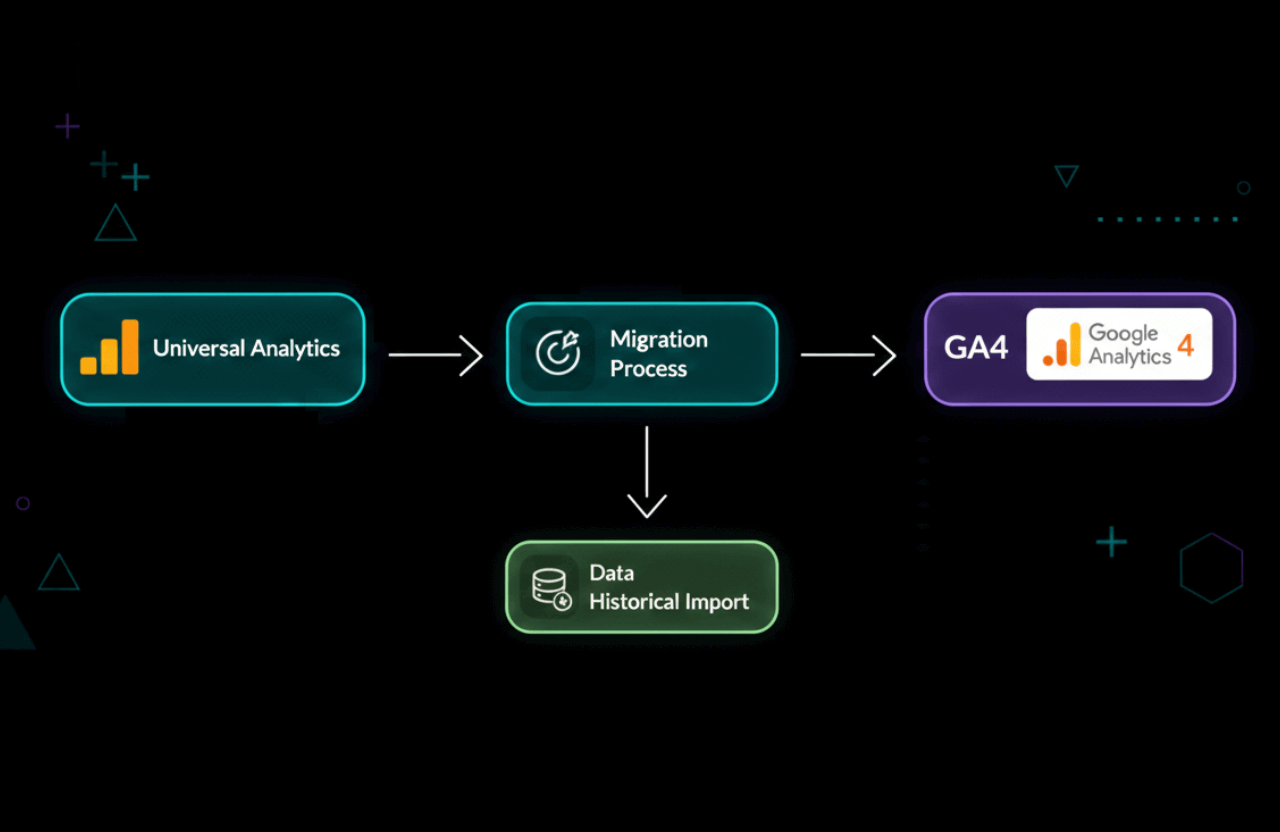
It is 2026. Universal Analytics stopped processing hits years ago. If you are still reading old tutorials trying to map UA goals to GA4 events, you are wasting your life.
You cannot import your historical UA data directly into the GA4 dashboard because the underlying data models are completely, fundamentally incompatible. If you didn't export your old UA data to BigQuery or CSV files before Google pulled the plug, that historical data is permanently gone.
Focus entirely on building a clean, ruthlessly accurate event structure in GA4 today. Let the past die.
Further reading: If you are still trying to figure out what happened, read Google’s official migration guide (which is mostly just an obituary for UA at this point).
GA4 Setup Troubleshooting FAQ
Why is my GA4 data completely blank?
You either installed the Measurement ID wrong, pasted the code outside the <head> tags, or you have an aggressive privacy extension blocking your own visits. Use Tag Assistant to verify.
Why doesn't my data match my Shopify or backend sales data?
GA4 is an analytics tool, not an accounting tool. Between ad blockers, cookie consent banners, and Safari's ITP tracking protection, GA4 will inherently miss about 10% to 15% of your actual sales. Rely on your backend for exact revenue, and use GA4 to spot traffic trends.
How do I track users jumping between my different domains?
You need Cross-Domain Tracking. Go into your Data Stream settings > Configure tag settings > Configure your domains. List all your URLs there so GA4 doesn't treat the exact same user as two different people when they click a link.
Resources and Next Steps
- GA4 Setup Assistant
- GA4 Developer Guides
- SEO for New Website Checklist
- Difference Between Article And BlogPosting Schema Markup With Code Examples
- How Do You Know If a Website Has Fake Traffic?
Listen, setting up GA4 perfectly is painful, but it is entirely non-negotiable. Without this raw data, you are completely at the mercy of blind luck and algorithm changes.
Stop procrastinating. Get the code injected into your header, configure your high-value conversion events, and start actually measuring what moves the needle on your website.